Introduction and Quick Summary
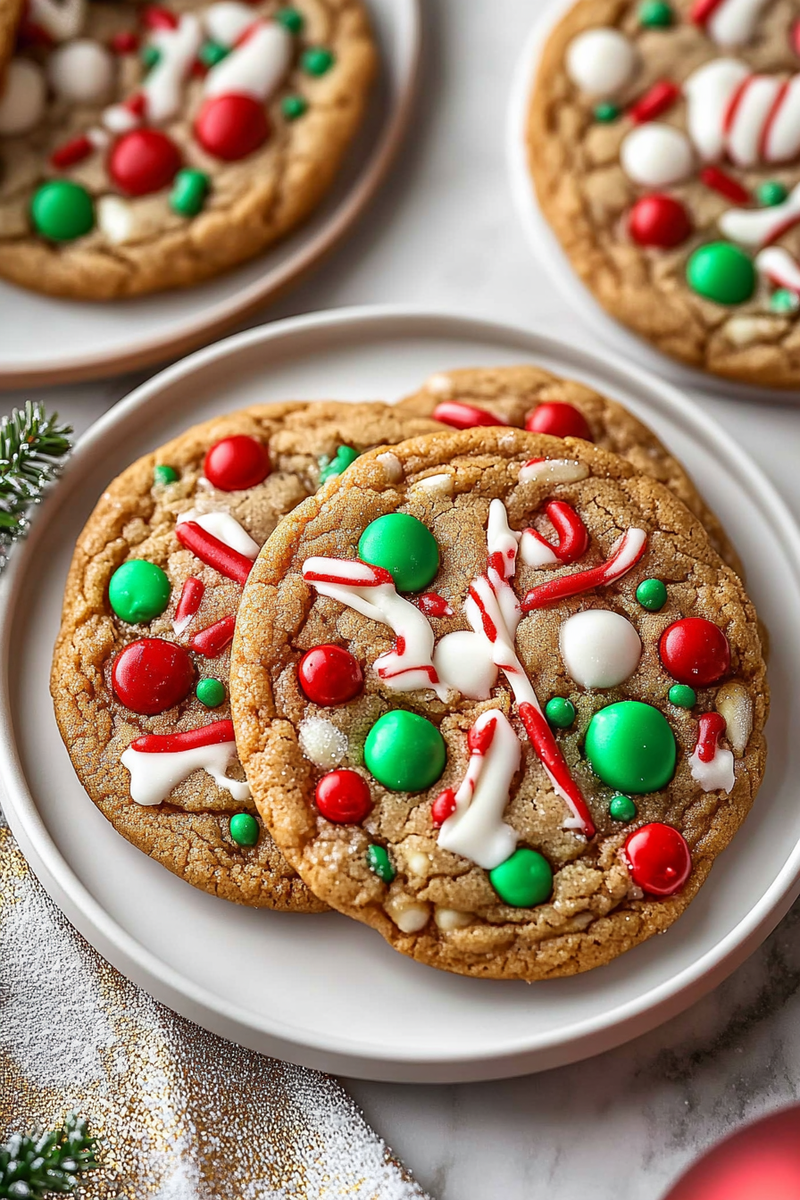
The holiday season is a time for joy, celebration, and of course, delicious treats. One of the most delightful creations you can whip up in your kitchen are the best kitchen sink Christmas cookies. These unique cookies are an exciting mix of flavors and textures, making them a perfect addition to any holiday gathering. Imagine biting into a soft, chewy cookie filled with chocolate chips, nuts, dried fruits, and even candies—all in one bite! They embody the spirit of the holidays by combining everything you love about festive baking.
In this article, we will guide you through creating these scrumptious cookies from scratch. Not only will you learn about the essential ingredients that make these cookies stand out, but also step-by-step instructions to ensure they come out perfectly every time. Whether you’re baking for a holiday party or simply want to enjoy a cozy treat at home, these best kitchen sink Christmas cookies will become a beloved tradition in your household. So roll up your sleeves and let’s get started on this delightful holiday adventure!
Main Ingredients
All-Purpose Flour
All-purpose flour serves as the foundation for our kitchen sink Christmas cookies. This versatile ingredient provides structure and stability while ensuring that your cookies have the perfect chewy texture. For this recipe, you’ll need 2 cups of all-purpose flour. Make sure to sift it before measuring to avoid any lumps and achieve better mixing with other dry ingredients.
Baking Soda
Baking soda is crucial for giving our cookies that wonderful rise and lightness. It acts as a leavening agent that reacts when combined with other ingredients like brown sugar or eggs. For this recipe, you will need 1 teaspoon of baking soda. Ensure it is fresh for optimal results—expired baking soda will not provide the desired lift.
Unsalted Butter
Using unsalted butter adds richness and depth of flavor to your kitchen sink Christmas cookies. It also helps achieve that tender crumb texture we all love in baked goods. You will need 1 cup (2 sticks) of softened unsalted butter for this recipe. Soften it at room temperature before using to ensure it creams well with the sugars.
Granulated Sugar
Granulated sugar contributes sweetness and helps create that lovely golden-brown color when baked. It plays an essential role in providing moisture to our cookie dough too. For this recipe, you’ll need 3/4 cup of granulated sugar. Remember to measure accurately for balanced sweetness.
Brown Sugar
Brown sugar adds moisture and a rich caramel flavor to our cookies due to its molasses content. It complements the granulated sugar beautifully in this recipe. Use 3/4 cup of packed brown sugar for added depth of flavor in your kitchen sink Christmas cookies.
Eggs
Eggs are vital for binding all our ingredients together while adding richness to the dough. They also help achieve that soft texture we desire in cookies. You will need 2 large eggs at room temperature for this recipe; this ensures they incorporate smoothly into the mixture.
Chocolate Chips
Chocolate chips are arguably one of the best additions to any cookie recipe! For these kitchen sink Christmas cookies, use 1 cup of semi-sweet chocolate chips or mix different types like dark or white chocolate chips for variety.
Nuts
Nuts add crunchiness and flavor complexity to our cookies! You can choose from walnuts or pecans based on your preference—both work wonderfully in this recipe! Use 1/2 cup of chopped nuts for added texture.
Dried Fruits
Dried fruits like cranberries or raisins introduce a touch of sweetness along with chewy texture variations that enhance every bite! Use 3/4 cup combined dried fruits—this adds a festive flair that’s perfect for holiday gatherings.
M&Ms or Holiday Candies
Adding M&Ms or colorful holiday candies makes these cookies visually appealing while providing bursts of sweetness throughout! Use 3/4 cup mixed candies for fun pops of color!
How to Prepare Best Kitchen Sink Christmas Cookies
Step 1: Preheat Your Oven
Start by preheating your oven to 350°F (175°C). Preheating ensures even cooking throughout each batch of your best kitchen sink Christmas cookies. While waiting for the oven temperature to rise, prepare two baking sheets lined with parchment paper or silicone mats—this prevents sticking!
Step 2: Cream Butter and Sugars
In a large mixing bowl, combine softened unsalted butter with granulated sugar and brown sugar using an electric mixer on medium speed until light and fluffy—about 2-3 minutes should suffice here! The fluffy mixture creates air pockets which help give structure during baking; it’s essential not only for flavor but achieving that perfect chewiness we’re after!
Step 3: Add Eggs
Once creamed together nicely (and if you’re feeling adventurous), add vanilla extract alongside those two large eggs directly into the mixture! Mix on low speed until fully incorporated—this step binds everything together seamlessly while adding moisture—a crucial component in any good cookie dough!
Step 4: Combine Dry Ingredients
In another bowl sift together all-purpose flour along with baking soda before slowly adding this mixture into your wet ingredients—mix gently until no dry flour remains visible! Avoid over-mixing; doing so can lead us down the path toward toughened baked goods instead of light ones!
Step 5: Fold In Add-ins
Now comes one of my favorite parts: folding in our chosen add-ins such as chocolate chips,nuts,dried fruits,and M&Ms! Use a spatula here—it allows us better control without breaking them apart too much; aim just until combined evenly distributed throughout dough consistency!
Step 6: Scoop Dough onto Baking Sheets
Using either two spoons or an ice cream scoop (for larger portions), drop generous tablespoons worth onto prepared baking sheets leaving ample space between each dollop—about two inches apart works well so they don’t merge during cooking phase later on!
Step 7: Bake The Cookies
Slide those beautiful trays into preheated oven allowing them approximately ten minutes bake time; keep an eye on them as edges begin turning golden brown but centers remain slightly soft—that’s how we know they’re done! Once ready remove from heat allowing cooling down briefly before transferring onto wire racks completely cool off afterwards ensuring optimal flavor development during final stages preparation process!

Serving and Storing Tips
Serving Suggestions
When serving your best kitchen sink Christmas cookies at gatherings or parties consider arranging them on festive platters adorned with seasonal decorations—this presentation enhances visual appeal significantly enjoying time spent together sharing delicious homemade treats amongst family friends alike! Pair these delightful bites alongside hot cocoa coffee tea making perfect accompaniment choices enhancing overall experience further elevating joyous occasion celebrating holidays together.
Storage Guidelines
To keep those delectable creations fresh longer store them within airtight containers placed either room temperature cool dry place away sunlight exposure; ideally consume within five days maximum though may last up seven days depending humidity levels surrounding environment affecting moisture retention rates naturally occurring over time period spent sealed tightly away storage sites chosen! Alternatively freezing unbaked dough balls works great too—simply freeze solid then transfer ziplock bags where stored frozen up three months future use whenever cravings strike unexpectedly need satiated immediately without fuss involved preparing fresh batches last minute excitement arises inevitably during busy festive seasons ahead enriching shared moments laughter warmth created around kitchens everywhere celebrating holidays cherished traditions maintained throughout generations past present future alike!
Your journey crafting these best kitchen sink Christmas cookies has just begun; each bite promises happiness warmth reminding us truly essence joys being together shared moments wrapped fond memories made around tables filled laughter love created every single day lived fully embracing spirit life brings us forth forward endlessly exploring adventures await ahead awaiting discovery through culinary delights shared among loved ones forevermore!
Mistakes to avoid
When baking the Best Kitchen Sink Christmas Cookies, it’s essential to steer clear of common pitfalls that can ruin your holiday treats. One significant mistake is not measuring ingredients accurately. Baking is a science, and even a small deviation in measurements can lead to cookies that are too dry or overly moist. Always use the right measuring tools, such as dry measuring cups for flour and sugar, and liquid measuring cups for liquids.
Another mistake is neglecting to preheat your oven. Many bakers skip this step, thinking it won’t make a difference, but an unheated oven can lead to uneven baking. Your cookies might spread too much or not rise properly if they go into a cold oven. Preheating ensures that your cookies bake evenly from start to finish.
Overmixing the dough is another common error. While it may seem innocuous to mix longer to achieve a uniform texture, overmixing can develop gluten in the flour, leading to tough cookies rather than soft and chewy ones. Mix just until the ingredients are combined for the best results.
Finally, one must be cautious with baking times. Each oven has its unique nuances; therefore, checking your cookies a few minutes before the suggested time is wise. This way, you can pull them out at just the right moment when they’re golden but still soft in the center.
Tips and tricks
Creating the Best Kitchen Sink Christmas Cookies requires not only avoiding mistakes but also employing effective tips and tricks that enhance your baking experience. First off, consider chilling your dough before baking. A chilled dough prevents cookies from spreading too much in the oven, allowing them to maintain their shape while yielding a denser texture.
Using high-quality ingredients can significantly impact flavor and texture. Opt for pure vanilla extract instead of imitation vanilla, and choose premium chocolate chips or nuts for added richness. Fresh ingredients bring depth and enhance the overall taste of your cookies.
Experiment with mix-ins! The beauty of kitchen sink cookies lies in their versatility. Incorporate various ingredients like dried fruits, different types of chocolate chips, or even crushed candies for festive flair. This creative approach allows you to personalize your cookies while making them visually appealing.
Don’t underestimate the power of proper storage after baking! To keep your Best Kitchen Sink Christmas Cookies fresh longer, store them in an airtight container at room temperature. You can also freeze them for later enjoyment; just ensure they cool completely before wrapping them tightly.
Suggestions for Best Kitchen Sink Christmas Cookies
Selecting the right combination of ingredients is key when crafting the Best Kitchen Sink Christmas Cookies. Start with a sturdy base by using all-purpose flour combined with a bit of cornstarch for added softness. This blend creates a tender cookie that holds up well against various fillings.
Consider incorporating oats into your recipe; they add texture and chewiness while balancing out sweetness from other ingredients like chocolate chips or dried fruit. Additionally, integrating spices such as cinnamon or nutmeg gives your cookies a warm holiday flavor that enhances their seasonal appeal.
Adding nuts is another suggestion worth considering; they provide crunch and depth in each bite. Pecans or walnuts are fantastic choices that complement chocolate beautifully while providing healthy fats.
Don’t forget about presentation! Drizzling melted chocolate on top or sprinkling sea salt enhances both flavor and aesthetics. A simple dusting of powdered sugar adds elegance without overwhelming sweetness.
Lastly, think about dietary preferences when sharing these delights with loved ones during holiday gatherings. Consider creating gluten-free options or vegan variations using appropriate substitutes like almond flour or flaxseed meal instead of eggs.


