Introduction and Quick Summary
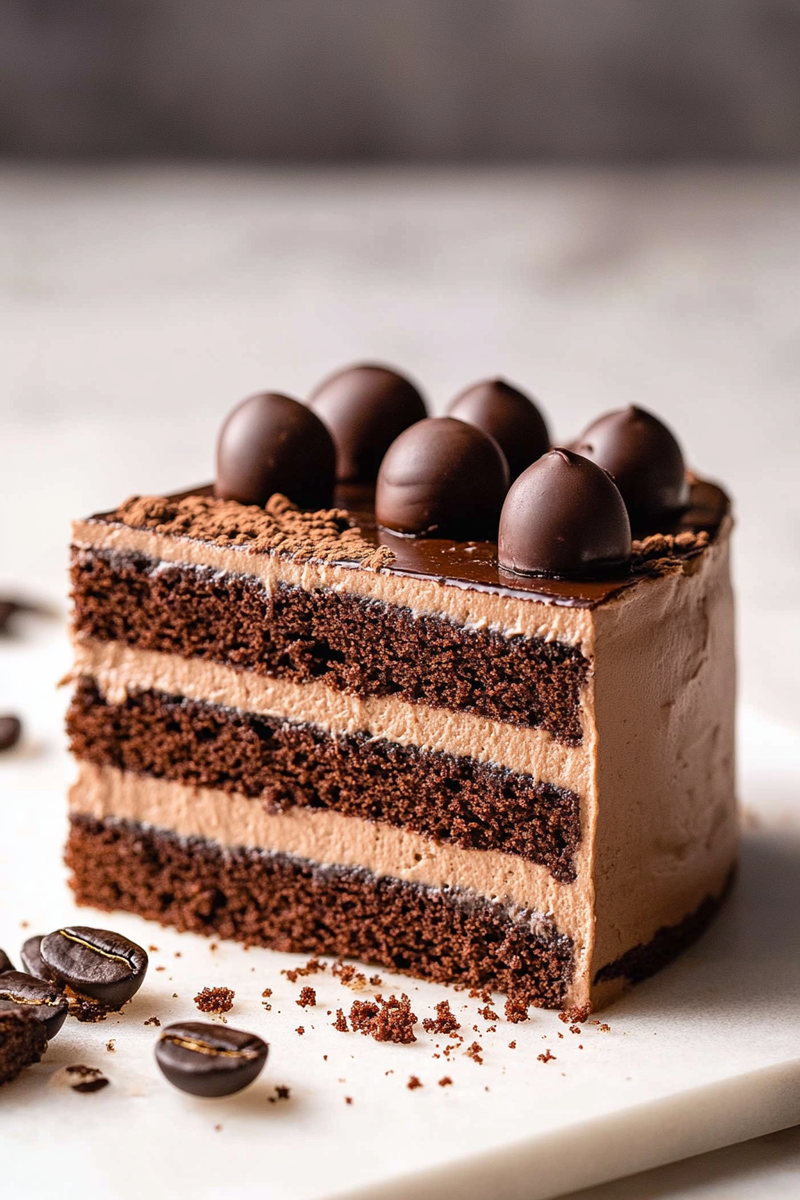
Welcome to the delightful world of baking, where we will guide you through the process of creating a mouthwatering coffee-chocolate-cake. This incredible dessert combines the deep flavors of rich chocolate with the aromatic allure of freshly brewed coffee, making it a perfect treat for any occasion. Whether you’re celebrating a birthday or simply satisfying your sweet cravings, this cake promises to be a showstopper.

In this recipe, you’ll discover how easy it is to whip up this indulgent coffee-chocolate-cake from scratch. With its moist texture and decadent frosting, every bite will transport you to a café in Paris. Not only is this cake easy to make, but it’s also versatile enough to serve at gatherings or enjoy as an afternoon pick-me-up. The blend of chocolate and coffee creates a harmonious taste that appeals to both chocoholics and caffeine aficionados alike.
Stay tuned as we delve into the ingredients you’ll need and the step-by-step instructions to create this delectable masterpiece. By the end of this article, you’ll be equipped with all the knowledge required to impress your friends and family with your baking prowess. Let’s get started on crafting your new favorite dessert!
Main Ingredients
To create the perfect coffee-chocolate-cake, gather these core ingredients:
All-Purpose Flour
All-purpose flour provides structure to our cake while allowing it to rise beautifully during baking. For this recipe, you will need 1 and ¾ cups (220 grams) of all-purpose flour. Sifting it before incorporating will ensure a light texture.
Granulated Sugar
Granulated sugar is essential for sweetness and moisture in our cake. You’ll require 1 cup (200 grams) for balance against the bitterness of cocoa powder and espresso. It also contributes to the cake’s tender crumb.
Unsweetened Cocoa Powder
Cocoa powder adds that rich chocolate flavor we crave. Use ¾ cup (65 grams) of unsweetened cocoa powder for optimal taste without overwhelming sweetness. Opting for high-quality cocoa can elevate your cake’s flavor profile.
Baking Powder and Baking Soda
These leavening agents work together to give your cake a nice rise and fluffy texture. You’ll need 1 teaspoon each of baking powder and baking soda for effective leavening.
Salt
A pinch of salt enhances all flavors in baked goods by balancing sweetness and providing depth. Just ½ teaspoon (3 grams) is needed here; don’t skip it!
Eggs
Eggs act as binders while adding moisture and richness to our batter. Include 2 large eggs at room temperature for best results—they also help emulsify other ingredients into a smooth batter.
Buttermilk
Buttermilk contributes tanginess and keeps your cake moist throughout its shelf life. Use 1 cup (240 ml) of buttermilk; if unavailable, you can substitute with milk mixed with lemon juice or vinegar.
Vegetable Oil
Oil provides moisture without weighing down your cake like butter might do in certain recipes. Use ½ cup (120 ml) of vegetable oil for a tender crumb that lasts longer than butter-based cakes.
Brewed Coffee
Brewed coffee amplifies both flavors—chocolate and caffeine—in our dessert! You’ll need ½ cup (120 ml) of strong brewed coffee; opt for espresso if available for an extra kick!
Vanilla Extract
Vanilla extract rounds out all flavor profiles beautifully; it’s an essential ingredient in any good cake! Use 1 teaspoon (5 ml) for richness without overpowering other tastes.
Chocolate Frosting
To finish off your masterpiece, prepare or purchase chocolate frosting according to personal preference—but homemade always delivers that extra love! Aim for about 2 cups (480 ml) when ready to frost.

How to Prepare Coffee-Chocolate-Cake
Now that you have gathered all necessary ingredients let’s dive into creating your delicious coffee-chocolate-cake!
Step One: Preheat Your Oven
Start by preheating your oven to 350°F (175°C). This ensures even cooking throughout the baking process once you place your batter inside later on; doing so prevents uneven textures or burnt edges—key factors that would ruin an otherwise perfect cake!
While waiting for it preheat completely—approximately fifteen minutes—you can move on by greasing two round nine-inch pans with either non-stick spray or butter along with dusting them lightly with flour afterward—this helps prevent sticking post-baking!
Lastly, line the bottoms using parchment paper circles cut out beforehand so they release effortlessly after cooling time has elapsed later.
Step Two: Mix Dry Ingredients
In a large mixing bowl, sift together all-purpose flour, granulated sugar, unsweetened cocoa powder, baking powder, baking soda, and salt until thoroughly combined—the goal here is uniform distribution throughout every bite rather than clumps forming later within batter consistency!
Once done sifting let’s proceed immediately onto wet ingredients ensuring no dry pockets remain behind during incorporation stages ahead—we want everything perfectly blended!
Step Three: Combine Wet Ingredients
In another bowl whisk together eggs until frothy followed by adding buttermilk alongside vegetable oil followed closely behind with brewed coffee mixed subsequently lastly incorporating vanilla extract—this combination creates luscious creaminess readying us toward folding into dry mixtures thereafter!
Make sure each component integrates smoothly without lumps before moving forward—this guarantees delightful results as we blend everything harmoniously together soon enough!
Step Four: Combine Wet & Dry Mixtures
Pour wet components directly onto dry ingredients gently folding using spatula rather than aggressive stirring motions risking overworking gluten formation yielding tougher cakes instead; remember gentle folding creates great air pockets leading towards lightness desired here too!
Keep going until no visible streaks remain apparent from either mixture—this should take only about two minutes maximum! Now divide evenly between those prepared pans ensuring equal heights across both sides during baking times later on bringing forth consistent results expected throughout each layer baked thoroughly alike next stage requires us prepping oven while ensuring cleaning utensils used thus far too!
Step Five: Bake Your Cake Layers
Preheating and Baking
Begin by placing your prepared pans on the middle rack of a preheated oven set to 175°C (350°F). Bake the layers for approximately 35 minutes, keeping an eye on them as ovens can vary. To check doneness, insert a toothpick into the center of each cake. If it comes out clean, the layers are ready. If not, extend the baking time by 5-minute intervals, testing again until done.
Cooling the Layers
Once baked, allow the layers to cool in their pans for about 10 minutes. Carefully transfer them to wire racks to cool completely. This step ensures the layers maintain their shape and avoid collapsing, setting the stage for a flawless final presentation.
Mistakes to Avoid
1. Measuring Ingredients Incorrectly
Accurate measurements are crucial for baking success. Use proper measuring tools and avoid scooping flour directly from the bag, which can lead to packing and a denser cake than desired.
2. Failing to Prepare Your Pan
Always grease and line your baking pans with parchment paper. This prevents sticking and ensures the cake releases easily, maintaining its structure and appearance.
3. Overmixing the Batter
Overmixing develops gluten, leading to a tough texture. Mix just until the dry ingredients are incorporated for a light, fluffy cake.
4. Using Cold Ingredients
Cold eggs or butter can result in uneven mixing and an undesirable consistency. Let ingredients come to room temperature before mixing for better results.
5. Not Cooling the Cake Properly
Cutting into a hot cake can cause it to crumble. Let the cake cool in the pan for 10 minutes, then transfer to a wire rack to cool completely.
Final Touch
By following these steps and avoiding common mistakes, you’ll create beautifully baked cake layers ready for assembly and decoration. Enjoy the process and the delicious results that come with attention to detail and care!

Tips and tricks
To create the perfect coffee-chocolate cake, consider these essential tips and tricks. First, choose quality ingredients; fresh cocoa powder and high-quality coffee will significantly enhance flavor. Opt for brewed coffee in your recipe instead of instant coffee granules for a richer taste.
Preheating your oven is critical when baking any cake. An oven that isn’t at the right temperature can lead to uneven cooking or failure to rise properly. Use an oven thermometer if needed, as many ovens can be off by several degrees.
Incorporating espresso powder into your batter intensifies the coffee flavor without making it overly bitter. Just a teaspoon added during mixing will give depth without overpowering the chocolate notes.
Using buttermilk instead of regular milk adds moisture and tenderness due to its acidity. If you don’t have buttermilk on hand, simply mix milk with a tablespoon of vinegar or lemon juice and let it sit for about 5-10 minutes before using.
Also, consider adding chocolate chips or chunks into the batter for extra texture and bursts of chocolate flavor that complement the coffee beautifully. This small addition can elevate your cake’s overall experience.
Lastly, always allow your baked cake layers to cool completely before frosting them. This step prevents melting and ensures that your frosting stays firm and holds its shape throughout serving.
Suggestions for coffee-chocolate-cake
When preparing a coffee-chocolate cake, there are several suggestions that can enhance both flavor and appearance. First, think about layering flavors by adding different types of chocolate—dark chocolate in the batter paired with milk chocolate frosting creates an appealing contrast that delights every palate.
You might also experiment with flavored syrups or liqueurs like Kahlua or Irish cream mixed into your frosting or drizzled over cakes for an adult twist on this classic dessert. Just remember not to add too much liquid; you want a balanced flavor without compromising texture.
Decorations matter! Dusting cocoa powder or powdered sugar over the top adds visual appeal while keeping things simple yet elegant. You could also opt for some shavings of dark chocolate sprinkled on top as an eye-catching finish.
Pairing this indulgent dessert with whipped cream or ice cream on the side adds yet another layer of richness, balancing out flavors perfectly while providing contrasting textures as well.
If you plan on serving this cake later or want leftovers, consider wrapping slices tightly in plastic wrap before placing them in an airtight container; this will help retain moisture and freshness for days afterward.
For those looking for gluten-free options, substitute regular flour with almond flour or a gluten-free blend specifically designed for baking; just adjust baking times accordingly as they may vary slightly compared to traditional flours used in recipes!

FAQs
What makes coffee-chocolate-cake unique?
The combination of rich chocolate with bold coffee creates a delightful balance between sweetness and bitterness in every bite. Coffee enhances the natural flavors found within chocolate while providing depth that elevates this dessert beyond standard cakes! Each slice offers indulgence paired perfectly together—a must-try treat for any dessert lover!
Can I use decaffeinated coffee?
Absolutely! If caffeine isn’t suitable for you but love flavors associated with coffee-chocolate-cake—decaffeinated options work beautifully without sacrificing taste! Simply brew decaf as you would regular brew ensuring flavor remains intact throughout baking process giving guests delicious treats minus jitters!
How do I store leftover coffee-chocolate-cake?
To keep leftover slices fresh longer—wrap individual portions tightly using plastic wrap then place them inside an airtight container! It keeps moisture intact while preventing any unwanted odors from entering—allowing indulgence anytime cravings strike without losing quality!
Can I freeze my coffee-chocolate-cake?
Yes indeed! Freezing works excellently if you’ve made more than enough! To freeze—let entire cooled layer rest first before wrapping securely using both plastic wrap followed by aluminum foil—this prevents freezer burn while sealing freshness away! When ready—thaw overnight inside fridge before serving!
What’s the best way to frost my cake?
Start by leveling each layer using serrated knife ensuring even surface when stacking one atop another! For smooth finish apply crumb coat (thin layer) first around entire exterior allowing crumbs stick together—refrigerate briefly before applying thicker main coat thereafter achieving beautiful slick finish perfect presentation!
Can I substitute ingredients?
Certainly—but substitutions should complement overall outcome rather than detract from intended result! For instance—swapping all-purpose flour with almond flour yields gluten-free option however requires adjustments on liquid ratios & bake times compared traditional methods yielding different textures overall!
Conclusion
In summary, crafting a perfect coffee-chocolate cake requires attention to detail along with understanding common mistakes new bakers may encounter through their journey! Remember that precision matters when measuring ingredients accurately while avoiding overmixing helps retain desired fluffy texture throughout final result—we’ve covered essential tips along ways improve upon initial attempts such utilizing quality products enhancing flavors naturally present within original recipe itself too!
Don’t forget about proper cooling techniques which play significant role maintaining structure integrity once baked allowing indulgence without risking crumbles! With these guidelines at hand plus suggestions regarding storage methods—you’ll soon master creation every guest will adore leaving lasting impression worth repeating time again down line too!
Baking should be enjoyable process filled experimentation & creativity so feel free explore variations make uniquely yours finding joy delicious outcomes shared loved ones close—happy baking everyone!


