Introduction and Quick Summary
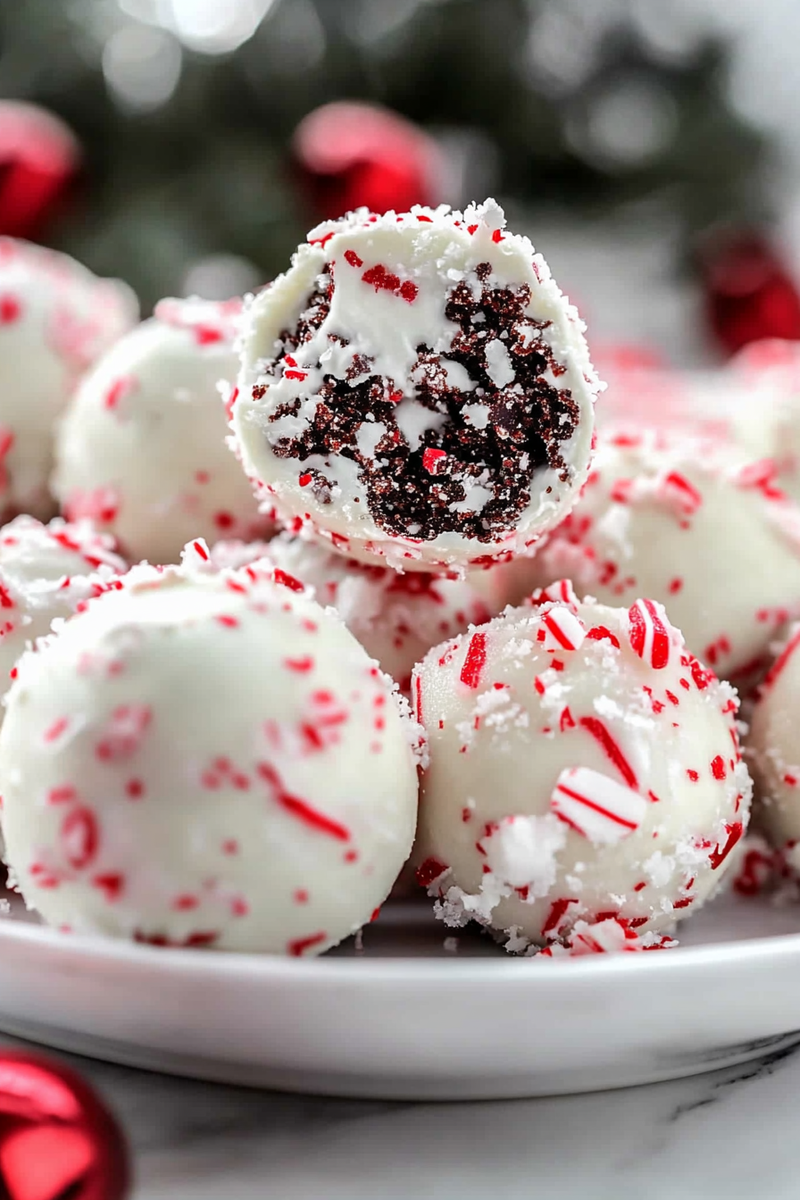
The holiday season is synonymous with joyful gatherings, twinkling lights, and irresistible treats. One delightful addition to your festive table is the No-Bake Peppermint Bark Snowballs. These delectable bites combine the rich flavors of chocolate and refreshing peppermint, creating a dessert that not only looks stunning but tastes heavenly. The best part? You don’t need an oven to whip these up! Whether you’re hosting a party or looking for a sweet gift for friends and family, this recipe will surely impress.

These snowball-shaped delights are incredibly versatile. You can serve them as a sweet treat during your holiday get-togethers or package them beautifully as gifts. The crunchy texture of the crushed candy canes paired with the smoothness of melted chocolate creates a harmonious blend that bursts in your mouth. Plus, they are super easy to make! With just a handful of ingredients and minimal time required, you can create a batch that will have everyone reaching for seconds. Let’s dive into this simple yet indulgent recipe that will brighten any holiday celebration!
Main Ingredients
Chocolate Chips
Chocolate chips serve as the base for our No-Bake Peppermint Bark Snowballs. Choose high-quality semi-sweet or dark chocolate chips for a richer flavor profile. You will need about 2 cups of chocolate chips to ensure that each ball is generously coated in luscious chocolate. Melting the chips creates a smooth texture essential for holding the snowball together while imparting a deep chocolate taste.
Cream Cheese
For this recipe, use 8 ounces of softened cream cheese. This key ingredient adds creaminess and richness to the filling while helping bind everything together. The slight tanginess balances out the sweetness from other ingredients perfectly. Make sure your cream cheese is at room temperature for easier mixing.
Powdered Sugar
Powdered sugar is crucial in adding sweetness and achieving the desired consistency in your snowballs. You’ll need about 1 cup of powdered sugar; it helps thicken the mixture while providing an enjoyable sweetness without being overwhelming. Its fine texture ensures it blends smoothly into the mixture.
Crushed Candy Canes
Candy canes not only add flavor but also provide a beautiful decorative touch to your peppermint snowballs. You’ll want approximately ½ cup of crushed candy canes; they contribute a delightful crunch and burst of minty freshness that complements the chocolate beautifully.
Vanilla Extract
A dash of vanilla extract enhances all flavors in this treat while adding depth to its overall taste profile. Use about 1 teaspoon; it brings warmth and richness to each bite, making your snowballs even more irresistible.
How to Prepare No-Bake Peppermint Bark Snowballs
Step 1: Prepare Your Workstation
Start by gathering all your ingredients and tools before diving into the preparation process. This step makes cooking much smoother and ensures you have everything within reach when needed. Prepare two large baking sheets lined with parchment paper for later use; this will prevent sticking when placing your finished snowballs on them.
Ensure that you have mixing bowls ready—one large bowl for combining wet ingredients and another smaller bowl for dry ingredients like powdered sugar and crushed candy canes. A microwave-safe bowl will also be necessary for melting your chocolate chips later on.
Step 2: Mix Cream Cheese and Sugar
In your large mixing bowl, combine the softened cream cheese with 1 cup of powdered sugar using an electric mixer or spatula until smooth and well-blended—this should take about 2-3 minutes at medium speed if using an electric mixer.
Make sure there are no lumps present in the mixture; it should be creamy yet thick enough to form small balls later on. Once fully combined, add in one teaspoon of vanilla extract to elevate the flavor profile further and mix until evenly distributed throughout.
Step 3: Add Chocolate Chips and Candy Canes
Next comes one of the most exciting parts—incorporating melted chocolate! In a separate microwave-safe bowl, melt your 2 cups of chocolate chips by heating them in short bursts (30 seconds) until fully melted and smooth—remember to stir between intervals!
Once melted, allow it to cool slightly before pouring it into your cream cheese mixture along with half a cup of crushed candy canes—this adds crunchiness along with vibrant color! Stir everything together until fully incorporated—you want an even distribution throughout without over-mixing.
Step 4: Forming Snowballs
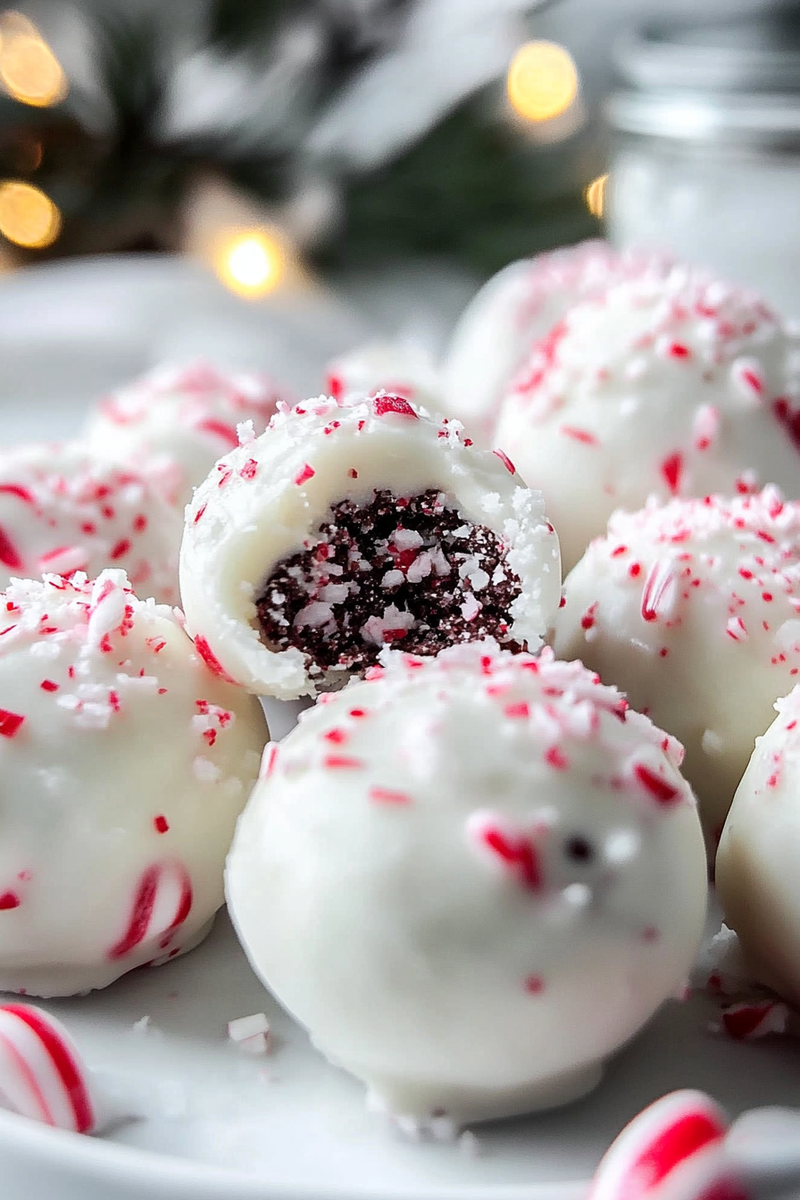
Now comes the fun part: forming those delightful snowball shapes! Use a cookie scoop or spoon to portion out small amounts (about 1 tablespoon each) from the mixture; roll them gently between your palms to create uniform balls—aim for about 24 pieces total based on portion size.
Place each formed ball onto prepared baking sheets lined with parchment paper—you want them spaced apart so they don’t stick together during chilling time later on! Once all are rolled out nicely onto sheets, pop them into the refrigerator for around an hour allowing them ample time to firm up properly before coating in more deliciousness!
Step 5: Final Coating & Presentation
After chilling time has passed (and they’ve set), melt additional chocolate—this time around two cups—for coating purposes using similar microwave techniques (30-second intervals). Dip each chilled snowball into melted chocolate ensuring full coverage; allow excess drip back into the bowl before placing back onto parchment-lined sheets again.
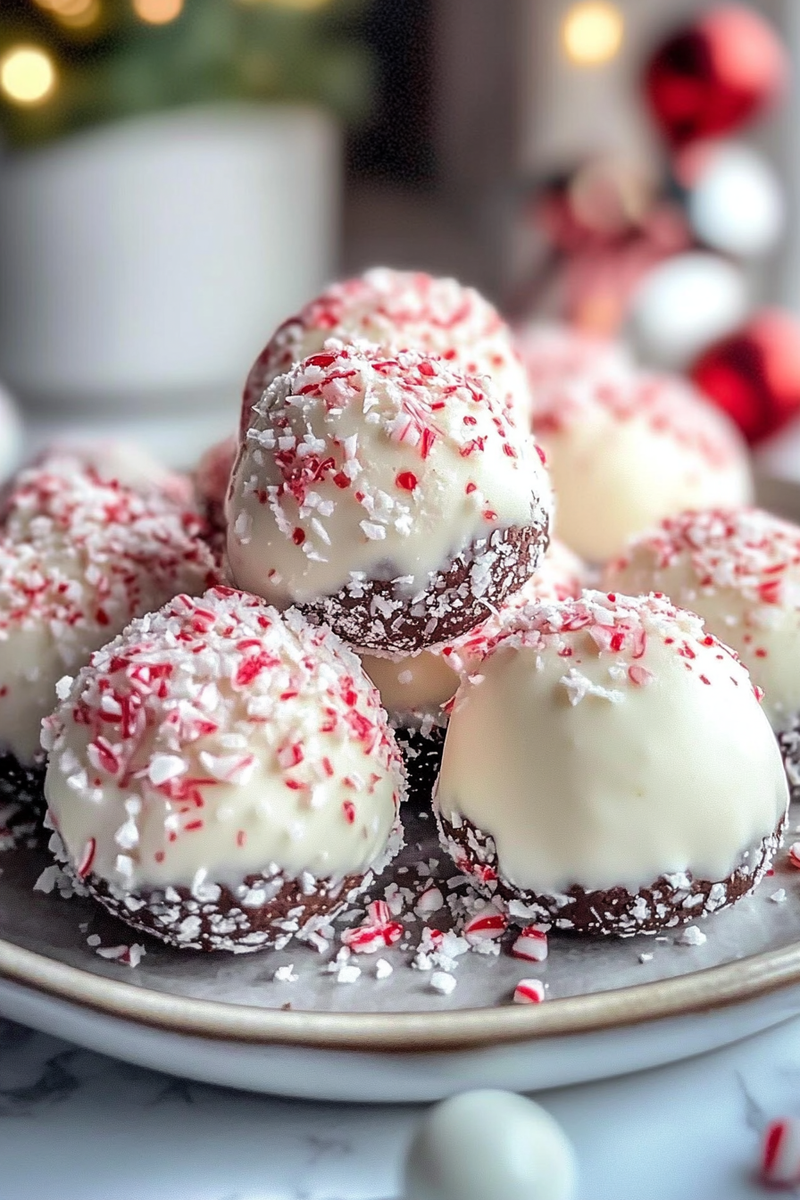
Sprinkle remaining crushed candy canes lightly on top while still warm from dipping—the finishing touch that makes these treats visually stunning! Finally allow completed snowy wonders another hour in fridge until completely set before serving or packaging up!
Serving and Storing Tips
Serving Suggestions
When serving your No-Bake Peppermint Bark Snowballs at gatherings or events, consider placing them on festive platters adorned with seasonal decorations like holly leaves or pinecones—this adds charm while elevating presentation value significantly!
Pairing these delightful bites alongside hot cocoa or coffee creates an inviting atmosphere perfect for mingling among guests—who wouldn’t love indulging in sweet treats paired with cozy beverages during chilly winter nights?
If you’re looking for creative ways to serve these delights individually without fussing over plates—consider using mini cupcake liners as containers—it keeps everything tidy yet charmingly presented at same time!
Storing Leftovers Properly
To keep any leftovers fresh longer after enjoying these tasty morsels—store them sealed tightly inside airtight containers preferably placed within refrigerator where cooler temperatures help maintain firmness! They should stay good up-to two weeks if stored properly—but trust me—they won’t last long once shared among family & friends!
If planning ahead towards holidays—feel free freezing any extra batches! Just layer separated between parchment paper so they don’t become stuck together upon thawing later down line when ready-to-serve occasion arises once again!
With these valuable serving tips along with detailed preparation instructions—the delightful journey towards enjoying homemade No-Bake Peppermint Bark Snowballs becomes truly unforgettable experience worth sharing around every festive table across seasons alike!
Mistakes to avoid
When making No-Bake Peppermint Bark Snowballs, several common mistakes can affect the final outcome. One significant error is not using high-quality chocolate. The chocolate serves as the base for your snowballs, so opting for subpar ingredients can lead to a less satisfying flavor and texture. Always choose good quality white or dark chocolate, as it melts better and provides a creamier consistency.
Another mistake to avoid is not allowing the chocolate to cool sufficiently before mixing in other ingredients. If you add ingredients like crushed peppermint or any other mix-ins while the chocolate is still hot, you risk melting them or altering their textures. Allow the melted chocolate to cool slightly for a few minutes before incorporating your add-ins. This ensures that everything combines beautifully without compromising on taste.
One more common pitfall is being too hasty with shaping your snowballs. It may be tempting to rush this step, but if you don’t allow the mixture to chill adequately, it will be difficult to form into balls. Refrigerate your mixture for at least 30 minutes before rolling it into shapes. This helps maintain their form and keeps them from becoming a gooey mess.
Finally, don’t forget about proper storage. Many people overlook how long these treats will last and how to keep them fresh. Store your No-Bake Peppermint Bark Snowballs in an airtight container in the fridge if they’re not consumed right away. Proper storage can enhance their shelf life and ensure they stay delicious longer.
Tips and tricks
To achieve perfect No-Bake Peppermint Bark Snowballs, consider these handy tips and tricks. First, utilize parchment paper when setting up your workspace for rolling the snowballs. This simple addition makes clean-up easier and prevents sticking issues during the rolling process. You can place the rolled snowballs directly onto parchment-lined trays for quick cooling.
Another effective tip involves using different types of peppermint extracts or flavors to elevate your snowball creation. Experimenting with various flavor profiles can make each batch unique and exciting. For instance, try adding a hint of almond extract alongside peppermint for a delightful twist that enhances the overall flavor experience.
You should also consider garnishing your finished product creatively. Use crushed candy canes or even colorful sprinkles on top of each snowball to make them visually appealing, especially if you’re serving them at festive gatherings or holiday parties. A little added flair goes a long way in making these treats stand out.
Moreover, be mindful of portion sizes when shaping your snowballs. Smaller portions are easier to eat and create an inviting presentation on platters. Stick to bite-sized treats that are easy for guests to grab without making a mess.
Lastly, don’t overlook using different types of nuts or dried fruits as additional mix-ins within your peppermint bark mixture. Chopped almonds or cranberries can introduce new textures and flavors that complement peppermint beautifully, ensuring a delightful surprise in every bite.
Suggestions for No-Bake Peppermint Bark Snowballs
If you’re looking for variations of No-Bake Peppermint Bark Snowballs, consider these suggestions that will enhance your treat-making experience. One great option is substituting half of the white chocolate with dark chocolate for those who prefer richer flavors. This combination not only adds depth but also appeals to diverse palates among guests.
Another suggestion involves incorporating various toppings beyond just crushed candy canes. Try drizzling melted chocolate over the finished snowballs or rolling them in cocoa powder for an unexpected twist on appearance and taste. These variations will keep everyone guessing what’s inside each snowball while providing delightful surprises with every bite.
You might also think about adding festive colors through food coloring in your white chocolate base before forming the balls. A hint of red or green can give your no-bake treats a more vibrant look while still maintaining that delicious peppermint essence.
Incorporating seasonal spices such as cinnamon or nutmeg adds warmth and complexity that enhances flavor during colder months when peppermint is most popular. Just a pinch mixed into the melted chocolate could elevate your snowballs significantly.
Lastly, consider presenting them in unique ways at gatherings by placing them in individual cupcake liners or decorative boxes instead of traditional platters; this approach adds elegance while making serving easy during parties or events.

FAQs
What are No-Bake Peppermint Bark Snowballs?
No-Bake Peppermint Bark Snowballs are festive holiday treats made with melted chocolate and crushed peppermint candies. Additional ingredients like nuts or cereals add texture. These treats require no baking. Instead, they are chilled until firm and shaped into small, snowball-like bites. They are typically coated in melted white chocolate and rolled in crushed candy canes for a signature festive look—perfect for sharing during the holidays!
How long do No-Bake Peppermint Bark Snowballs last?
When stored in an airtight container and refrigerated, these treats can last for one to two weeks. The shelf life depends on the freshness of the ingredients but is generally stable. The chocolate base acts as a natural preservative, helping to prevent spoilage when kept cool.
Can I make No-Bake Peppermint Bark Snowballs ahead of time?
Absolutely! These treats are very convenient to prepare ahead of time. Many bakers recommend making them a day in advance to allow the flavors to meld. This extra time enhances the taste and ensures they are ready to serve.
Are there any dietary modifications I should consider?
Yes, dietary modifications are possible! For gluten-free versions, use certified gluten-free ingredients. Non-dairy chocolates and coconut milk-based substitutes work well for those avoiding dairy. Always check ingredient labels carefully to ensure they meet specific dietary needs.
How do I store leftover No-Bake Peppermint Bark Snowballs?
To keep them fresh, place the leftover treats in an airtight container. Refrigerate immediately after cooling to preserve texture and flavor. This prevents moisture from making the snowballs soggy over time.
Can I freeze No-Bake Peppermint Bark Snowballs?
Yes, you can freeze them! Wrap each snowball tightly in plastic wrap and place them in a freezer-safe bag or container. Avoid exposing them to air to prevent freezer burn. Consume within three months for the best taste and texture.
Conclusion
In conclusion, creating delightful No-Bake Peppermint Bark Snowballs requires attention to detail but offers immense rewards both visually and taste-wise! By avoiding common mistakes like choosing low-quality chocolates or rushing through shaping processes while implementing helpful tips such as utilizing parchment paper during preparation ensures success every step along way! Variations broaden enjoyment further catering diverse preferences though proper storage remains key keeping treats fresh longer allowing sharing among family friends alike throughout festive seasons ahead! Enjoy experimenting with flavors garnishes while mastering this simple yet satisfying treat recipe turning gatherings unforgettable moments filled joy laughter around sweet indulgences shared together around tables filled love warmth during holidays celebrations cherished forevermore!

