Introduction and Quick Summary
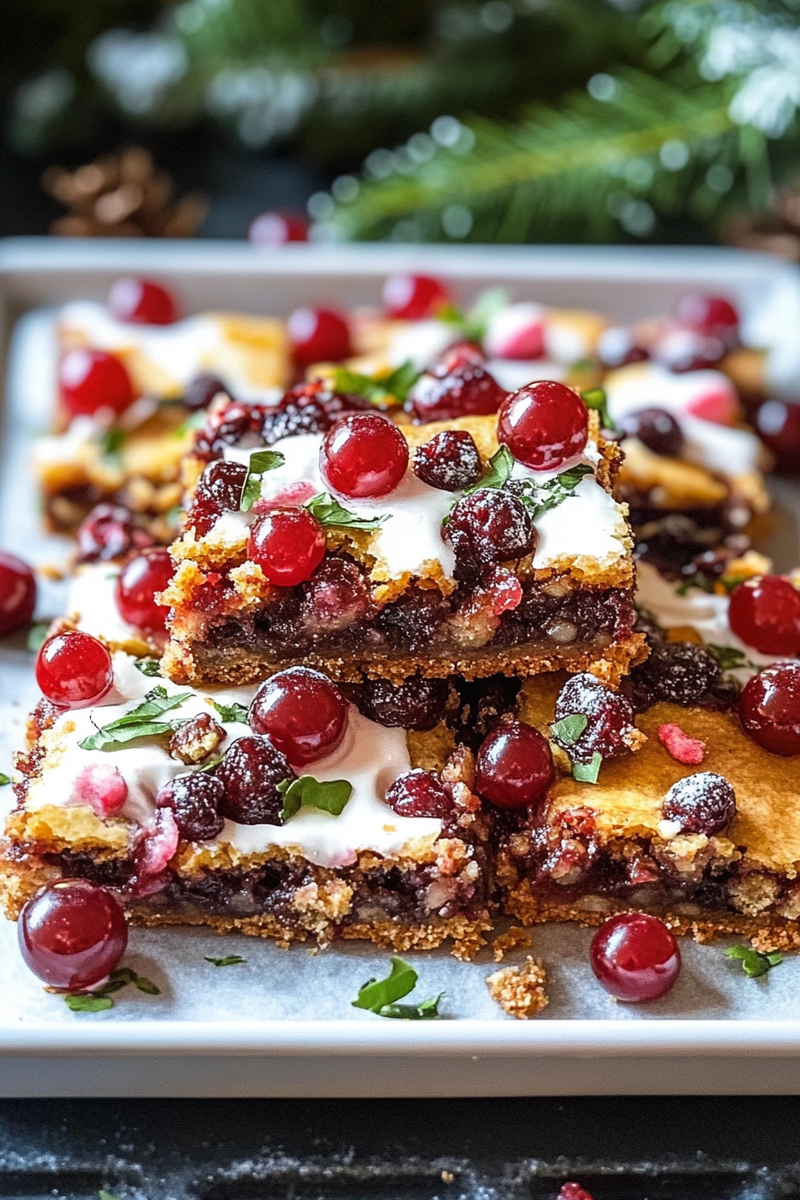
Christmas is a time for joy, celebration, and of course, delicious treats. One of the most beloved holiday desserts is the delightful Christmas Cherry Bars. These sweet and tangy bars are packed with vibrant cherry filling and a buttery crust that makes them irresistible. Whether you’re hosting a holiday party or simply treating your family to something special, these bars are sure to bring smiles all around.

What makes Christmas Cherry Bars truly special is their versatility. They can be served warm with a scoop of vanilla ice cream or enjoyed cold as a refreshing snack. The combination of cherries and a crumbly base creates a flavor profile that perfectly captures the essence of the season. Plus, they are incredibly easy to prepare, allowing you to spend less time in the kitchen and more time creating memories with loved ones.
In this article, you will find everything you need to know about making these scrumptious Christmas Cherry Bars from scratch. We will cover the essential ingredients needed for this recipe, provide step-by-step instructions on how to prepare them, and share some serving and storage tips to keep your bars fresh throughout the holidays. Get ready to impress your guests with these festive treats that embody the spirit of Christmas!
Main Ingredients
Cherries
Cherries are the star ingredient in our Christmas Cherry Bars. You can use either fresh or frozen cherries for this recipe. If using fresh cherries, be sure to wash them thoroughly and remove the pits before cooking. For frozen cherries, allow them to thaw completely before using them in your filling. You will need approximately 2 cups of cherries for this recipe. Their natural sweetness combined with a hint of tartness adds depth to your dessert.
Sugar
Sugar plays a crucial role in balancing out the tartness of cherries while providing sweetness needed for our dessert bars. For this recipe, you will require about 1 cup of granulated sugar. This amount will ensure that your filling is sweet enough without overshadowing the natural flavor of the cherries. You may also use brown sugar if you prefer a richer taste in your crust or filling.
All-Purpose Flour
All-purpose flour serves as the backbone of our crust and helps create a sturdy base for our cherry filling. You’ll need around 2 cups of all-purpose flour for this recipe. This amount provides enough structure without making the bars too dense or heavy. Make sure it’s sifted before measuring to ensure an even texture throughout.
Unsalted Butter
Unsalted butter adds richness and moisture to both the crust and filling of our Christmas Cherry Bars. In this recipe, you will need 1 cup (or 2 sticks) of softened unsalted butter. Using unsalted butter allows you better control over the saltiness in your dish since we’ll add salt separately.
Baking Powder
Baking powder is essential for helping our crust rise slightly while keeping it tender rather than dense. This recipe requires 1 teaspoon of baking powder mixed into your flour before combining it with other dry ingredients.
Salt
A pinch of salt enhances all flavors in your dessert by balancing sweetness while highlighting fruity notes from cherries! Use about half a teaspoon when mixing into dry ingredients; it complements both sweetness from sugar as well as tartness from cherries beautifully.

How to Prepare Christmas Cherry Bars
Step 1: Prepare Your Ingredients
Start by gathering all necessary ingredients together on your countertop—this includes cherries (fresh or frozen), granulated sugar, flour, unsalted butter (softened), baking powder, and salt mentioned earlier! Preheat your oven at 350°F (175°C) so that it’s ready when you’re done mixing everything together!
Once everything is set up nicely within reach—wash those cherries if they’re fresh or let frozen ones thaw out—then pit them carefully depending on what type you’re using! Next up—we’ll move onto mixing dry ingredients together!
Step 2: Mix Dry Ingredients
Take a large mixing bowl; add sifted all-purpose flour along with sugar (1 cup) along with baking powder (1 tsp) & salt (½ tsp). Stir gently until evenly combined—this helps ensure even distribution throughout mixture later on! Remember not too hard here; we want light airiness!
Afterward—let’s work on incorporating cold unsalted butter! It’s best if it has been sitting out at room temperature for about twenty minutes prior—it should feel soft yet still retain its shape when pressed gently! Cut into small cubes before adding directly into dry ingredients; use pastry cutter or fingertips rubbing together until mixture resembles coarse crumbs similar looking like sandcastles!
Step 3: Create Crust Layer
Now we’re ready—the next step involves forming that dough into crust format! Gather roughly two-thirds portion from mixed crumbs & press evenly across bottom surface lined within parchment paper-wrapped square pan measuring around 9 inches x 9 inches deep however closely fits snugly without gaps between edges!
Make sure pressing down firmly yet maintaining even thickness throughout entire layer—you don’t want one part thicker than another otherwise might bake unevenly later on! Once pressed successfully pop into preheated oven at 350°F (175°C) baking for approximately fifteen minutes until edges just start turning golden brown without overcooking altogether!
Step 4: Prepare Cherry Filling
While crust bakes away—let’s focus next on preparing delicious cherry filling itself! In separate bowl combine pitted/chopped fresh/frozen cherries totalizing roughly two cups alongside remaining one-third crumb mixture previously set aside earlier along with additional quarter-cup granulated sugar thoroughly mixed together ensuring even coating covering fruits entirely!
Once complete pour carefully over pre-baked pie shell gently spreading evenly across entire surface area ensuring no bare spots remain visible underneath therefore helping prevent burning edges later during final bake cycle afterwards…
Step 5: Bake Again
After layering fruit mixture atop already baked crust place back inside oven allowing another thirty-five forty minutes pass by checking often halfway through towards end ensuring no burning occurs while bubbles forming signify readiness nearing completion soon enough!
When finished baking remove pan from heat source & allow cooling down completely before slicing neatly into squares ready serve afterward garnishing optional whipped cream drizzle perhaps vanilla ice cream scoop atop each slice enhancing flavors further giving extra festive touch everyone loves indulging themselves during Christmastime festivities alike!
Serving and Storing Tips
Serving Suggestions
Christmas Cherry Bars can be served warm or cold based on personal preference; if serving warm consider adding scoop vanilla ice cream atop each piece adding delightful contrast between creamy texture against tart fruit layer beneath! Alternatively enjoy chilled straight out fridge accompanied alongside hot beverage such as cocoa tea coffee creating cozy atmosphere perfect winter gatherings inviting friends family alike share momentous occasion together while indulging delectable delicacies made thoughtfully prepared beforehand!
Storage Instructions
To maximize freshness store any leftover pieces covered tightly within airtight container stored refrigerator up-to five days maintaining optimal taste quality retaining moistness avoiding drying out quickly becoming stale overtime instead keeping flavors intact longer preserving joyful spirit associated celebrating holidays ahead knowing treats await whenever cravings strike unexpectedly coming back home after long day filled activities outside enjoying snow-filled wonderland surrounding us everywhere else finding solace indoors tucked away snugly beside fireplace perhaps reading favorite book relaxing environment created just right setting mood perfect evening winding down finally relaxing together sharing laughter stories reminiscing about fond memories made past years gone-by reminding us how blessed truly are amidst joyful chaos swirling around us every year during festive season passing by swiftly yet leaving behind lasting impressions worth cherishing forevermore…
Mistakes to Avoid
One common mistake when preparing Christmas Cherry Bars is failing to measure ingredients accurately. Baking is a precise science, and even slight variations in measurements can lead to undesirable results. Always use the right measuring tools, such as dry measuring cups for solids and liquid measuring cups for liquids. This ensures the correct ratios of flour, sugar, and cherries, which are crucial for achieving that perfect texture.
Another mistake is using stale or subpar cherries. Freshness matters significantly in baking. If you opt for canned cherries, ensure they are not past their expiration date and are packed in juice rather than syrup to maintain a natural sweetness. Stale ingredients can compromise taste and texture, resulting in bland or overly sweet bars that don’t capture the festive spirit.
Additionally, many bakers underestimate the importance of chilling the dough before baking. Chilling helps solidify fats in the dough, leading to firmer bars that hold their shape better during baking. If you skip this step, your Christmas Cherry Bars may spread too much, resulting in thin, crispy edges instead of a chewy center. Always allow your dough to chill for at least 30 minutes before spreading it into the baking pan.
Lastly, neglecting proper cooling time can ruin your Christmas Cherry Bars’ presentation. Allowing these bars to cool completely before cutting is essential for clean slices. If you cut them while they’re warm, they might crumble or fall apart. Patience pays off here; let them cool on a wire rack for optimal results.
Tips and Tricks
To create delightful Christmas Cherry Bars, start by using high-quality ingredients. The type of flour you choose impacts texture significantly; all-purpose flour typically works best for a balanced result. Avoid cheap alternatives that may contain additives or preservatives affecting flavor.
Incorporate almond extract along with vanilla extract in your recipe for an enhanced depth of flavor. Almond extract complements the cherries beautifully and adds a subtle nutty essence that elevates your dessert from ordinary to extraordinary. Just a teaspoon can make a significant difference without overpowering the cherry flavor.
When it comes to mixing your batter, be careful not to overmix after adding flour. Overmixing can lead to tough bars instead of delightful tenderness. Mix just until combined; small lumps are fine! The goal is to maintain some air in the batter for lightness while ensuring all ingredients are well incorporated.
For added visual appeal and texture variation, consider sprinkling chopped nuts or coconut flakes on top before baking. This extra layer not only enhances flavor but also provides a pleasing crunch against the soft cherry filling. Choose walnuts or pecans if you prefer nutty flavors; however, ensure no one has nut allergies when serving these festive treats.
Lastly, remember the power of presentation! Once baked and cooled, dust your Christmas Cherry Bars with powdered sugar just before serving for an elegant touch that screams holiday charm. It creates an inviting look that will entice guests at any gathering.
Suggestions for Christmas Cherry Bars
When making Christmas Cherry Bars, selecting the right type of cherries is key to achieving maximum flavor impact. Opt for tart cherries if you prefer a tangy contrast against sweet batter or go with sweet varieties if you enjoy a more straightforward sweetness profile. Experimenting with different types can help you discover what fits your taste best!
Consider adding zest from citrus fruits like lemon or orange into your batter or topping mixture as it enhances freshness and brightens flavors remarkably well without overpowering the cherry essence present in your bars.
If you’re hosting a large gathering during holiday celebrations, consider doubling your recipe! These bars tend to disappear quickly because they are so deliciously addictive! Doubling allows you to serve more guests without compromising quality since these treats store well in airtight containers.
For those who love experimenting with textures further, try incorporating layers into your bars by adding a cream cheese layer between two layers of cherry filling and crust mixture! This addition provides richness and creaminess that compliments cherries superbly while offering various textures throughout each bite!
Lastly, customize servings by cutting them into fun shapes using cookie cutters instead of traditional squares once cooled down completely! Using star-shaped cutters can add extra festive charm perfect for holiday celebrations!
FAQs
What are Christmas Cherry Bars?
Christmas Cherry Bars are delightful dessert treats made primarily from cherries baked into a soft bar-style cookie base. They often feature a buttery crust topped with sweetened cherries mixed with sugar and sometimes almond extract for added flavor depth. Perfect as holiday treats due to their festive color and delicious taste!
How do I store leftover Christmas Cherry Bars?
To keep leftover Christmas Cherry Bars fresh after baking them up during festive gatherings, store them in an airtight container at room temperature if consumed within three days. For longer storage options—upwards of one week—refrigeration works best! Ensure they’ve cooled completely prior placing them inside containers to prevent moisture buildup!
Can I freeze Christmas Cherry Bars?
Absolutely! Freezing is an excellent way to preserve leftover Christmas Cherry Bars for future enjoyment while maintaining their delicious taste! After cooling down completely post-baking process—cutting them into squares makes it easier—wrap each portion individually using plastic wrap then place them inside freezer-safe bags/containers labeled with dates (to keep track). They’ll stay good frozen up until three months!
Can I substitute fresh cherries with canned ones?
Yes! Canned cherries offer convenience when fresh options aren’t available; however, ensure they’re packed in juice rather than syrup so as not overly sweeten your final product while still enjoying great cherry flavor profiles overall! Drain any excess liquid before incorporating into recipes properly!
What can I serve alongside my Christmas Cherry Bars?
Pairing delightful treats like hot cocoa topped with whipped cream complements these indulgent desserts perfectly during wintertime festivities! Alternatively consider serving alongside vanilla ice cream or homemade whipped cream drizzled lightly overtop—that contrast between warm bars combined cold toppings creates wonderfully satisfying bites!
How long will my Christmas Cherry Bars last?
Properly stored (in airtight conditions), expect these scrumptious treats lasting around 3-5 days at room temperature without losing flavor integrity! If refrigerated though—extend shelf life slightly longer (upward towards one week) allowing everyone plenty opportunity indulge over time without rushing through batches too quickly!
Conclusion
In summary, creating mouthwatering Christmas Cherry Bars involves avoiding common mistakes such as inaccurate measurements and improper ingredient choices while embracing helpful tips like using high-quality components and mixing techniques tailored for optimal results. Keeping freshness top-of-mind ensures these festive treats shine brightly when served at gatherings full of joy!
Remember also that customization options abound—from experimenting with different cherry varieties to layering flavors through unique additions like cream cheese or citrus zest—to truly make this recipe yours while delighting family members’ palates alike during holiday celebrations ahead.
Ultimately whether you’re serving up classic square cuts adorned with powdered sugar or fun festive shapes ready-made from cookie cutters—the joy brought forth through making (and sharing) these delectable desserts will surely elevate any holiday experience shared among loved ones gathered together celebrating cherished traditions anew each year!


